Create and Manage users
In order for a member of your team to access OpenBoxes, an administrator must create a user profile for them and assign them user permissions. Before we get to user creation, see this document for a brief overview of user permissions.
Create New User
Before you create a new user, check if a person record already exists for them. You can convert a Person to User to not create duplicate records. See this article on how you can check for person records.
Once you have confirmed that the person record does not exist for them, you can continue with the below steps to create a user profile for them.
- To create a new user, hover over the Configuration tab and click “User.”
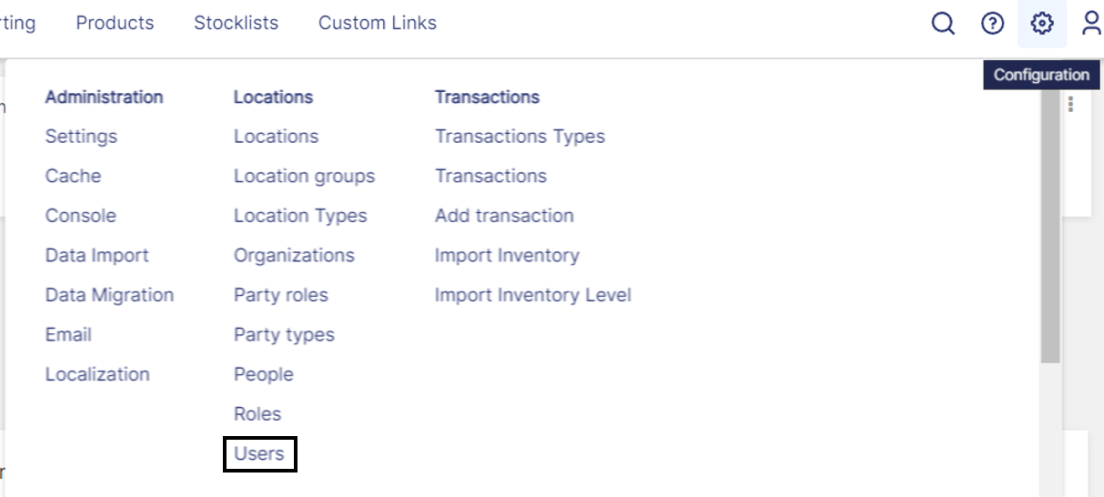
This will bring you to the user list page.

- On the user list page, click "Create user." This will lead to a screen where you can enter in key information about the user.

- Username: Create a username that will be easy for the user to remember. A common approach is to take the first letter of the user’s first name and their last name to create their username.
First Name: Type in first name.
In this example, Sally.
Last Name: Type in last name.
In this example, Smith.
Password: Enter a secure password.
It is recommended that the user change their password once they have successfully logged in.
- Email: Type in the user’s preferred email.
- Locale: Select language preference. This will change all OB interface into the preferred language where translations are available.
Click on "Save" and OB will bring you to the Edit User authorization screen. In the User Details tab, check the Active box. Then only, the user will be able to log in using their credentials.

Mark user as active in User Details tab.

- You will also need to give the user permissions in the system. Note: If you create a user but do not add permissions, the user will not be able to access Openboxes!!
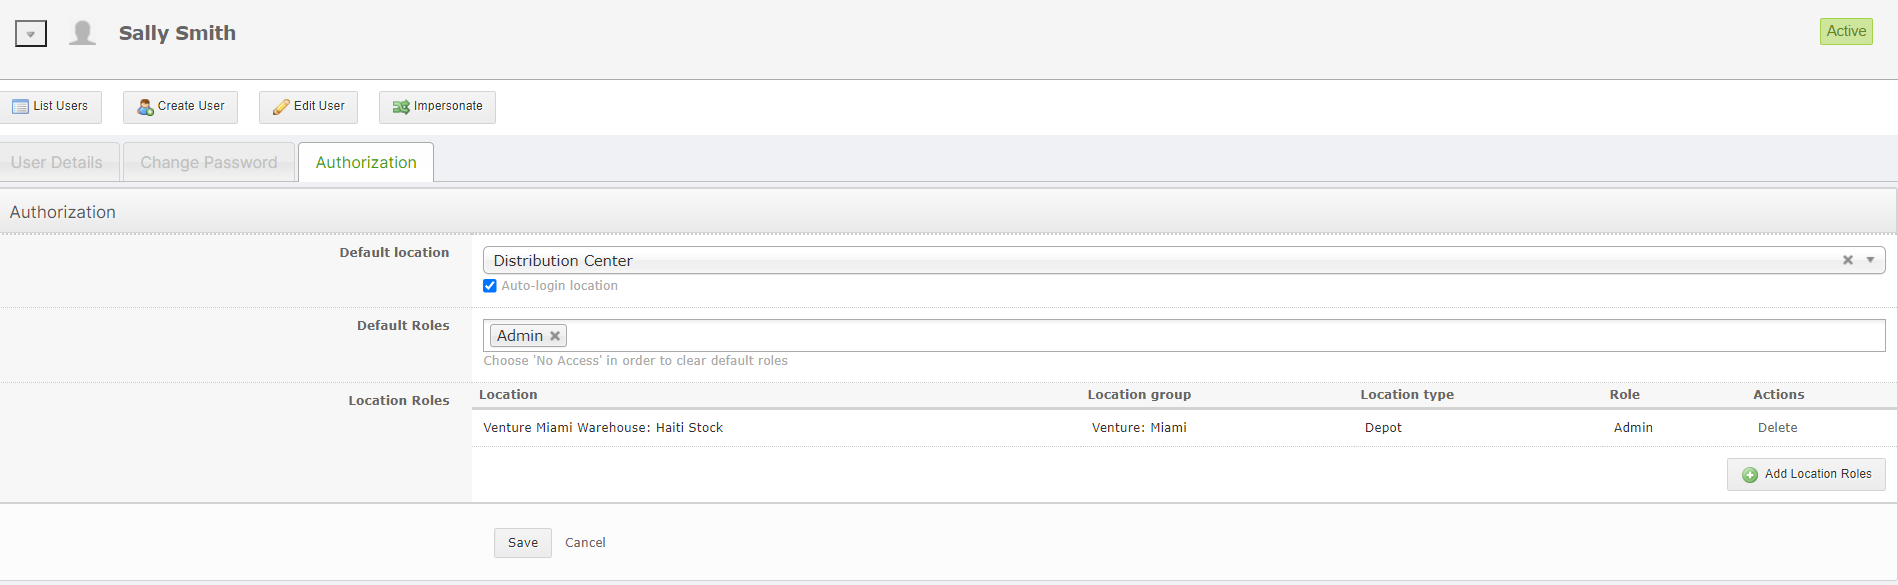
You can select a Default location. Pick the location the user works in the most. If you want the user to be automatically logged into that location upon opening OpenBoxes, click the auto-login location button.
Select Default Roles.
Every user must have a default role. The default role is the minimum role a user should have at every single location in OB. Don't worry about permission at specific locations. Instead, think about the permissions you want this user to have for the location they use the least in OpenBoxes. If you don't want this user to even see that location, set their default as No Access. If you want to them see it, set their default as browser. If you want them to be able to create transactions in all locations, set their default as manager, and so on. Scroll down for some examples.
Choose Location-specific permissions
Below the default location is a box called "location roles." You will see that in that box you can assign a role for the user for every location in Openboxes. This is the MOST important aspect of creating a user! You must decide, for every location, how the person will be allowed to interact with it. Any location left as default will be set as the default role described above.
The important thing here is to think "do I need to upgrade the users permission for this location?" If no, just leave it as is. If yes, refer to the table in the Intro to User Permissions document determine the proper permission level.
Role Assignment Examples
Ex1: I want my user to be able to see all depots in the system, but only to be able to create transactions in the warehouse where they work.
- Set default permission as browser. Add manager as a location-specific permission
Ex2: I want my user to be able to create transactions in the depot where they work, and even be able to create products and users. But I don't want them to be able to see depots at other facilities.
- Set default permission as no access. Add administrator as a location-specific permission
Ex3: I want my user to be able to see all locations in the system, but not make any changes
- Set default permission as browser and don't add location-specific permissions
Ex4: I want my user to be able to do anything, anywhere in the system
- Set default permission as superuser, do not set location-specific permissions
After choosing your default role, don't forget to add special permissions!
Financial user - Add this role in the default space for any user that you want to be able to see the unit cost of items in the system. Users without this permissions will see all costs blurred out.
Approver - Add this role for any user that will have permission to place or rollback POs.
Once you have finished editing permissions, press save. You have now created a user!
Editing User Profiles
Go to the user list by clicking Configuration > Users.

Configuration Menu - On the user list, click on the username of the user you would like to edit. This will bring you to the edit user page:


User Details Tab
On the first tab, pictured above, you can edit any field: Email Address, Username, User First and Last name, Language (locale—options are English, French, or Spanish) and have the account set to active or inactive.
Change Password Tab
On the "change password" tab, you can change the user's password.

Authorization Tab
On the third tab, you can change the user's permissions (see directions for creating a new user for a step-by-step guide to permissions).
